March 31, 2009

Easter Teacher Appreciation Gifts


Every major holiday, I love to make something special for the boys' teachers. For Easter/Spring, I made these "slotted wood ornament" eggs that were embellished with flowers and alphabet stickers. The pictures don't do justice to the cuteness of the ornament. I personalized each egg with the first initial of each teacher (i.e. Ms. E). The great thing about this project is that it can be disassembled and stored flat until next Easter/Spring. I sure hope the teachers like their eggs, I sure had a great time making them! I bought the kits from a local scrapbook store (Scrappin' Attack) but the actual product is made by Total Class Creative (ironically their products were designed by a teacher). I also made the carrot in the first picture but more details on that in the next blog! Keep a look out for a couple of other projects that I'm working on that were made using the Total Class Creative products... so cute, you will love them!

March 28, 2009

Workshop #3 - Easter/Spring

Today was the third workshop that I've hosted at my house. (I apologize now if the layout of the images are disproportionate, I've been having issues with my computer and the Internet!) The theme revolved around Easter and Spring and it included a handful of crafts that took some assembling. The bulk of the projects made required the use of my new favorite tool - the Big Shot Express (Sizzix). It's a die-cutting machine, but unlike my other die-cutting tools (Quickutz Squeeze and Revolution), it is AUTOMATED... at the push of a button, it takes the die-cut and paper and cuts/embosses in a flash, no more hand turning. And the best part is that it also can use the die-cuts from my Quickutz collection, YEAH! The projects included making an Easter/Spring card that had a pop-up message inside, a pop-up ball that could be used in a card or in our case on a string, two pillow boxes and two baskets.

Here was the card we made. All the stamps were from CTMH (Eastertime D1259), the grass was cut on the Quickutz Silhouette, the eggs and the bunny die-cuts were from Quickutz, the striped background paper was from DCWV, the scalloped square is from Marvy Punches, the pop-up feature was made with a Sizzix Bigz XL die-cut and I've had the flowers for so long I don't know the manufacturer (could be Prima). Sorry the pop-up image is sideways...oops!

This pop-up ball/Easter egg was so cute, the picture does not do it justice. This project took the most work but was worth the effort! All the pieces are created from the Sizzix Bigz XL Pop-up Ball. It can actually be attached to a card and when you open the card, it would pop-up to it's current state. I'm working on some projects that has some embellishment to what we made. When it's done, I will post it. I choose to put the ribbon through the top so that it can be hung up and displayed so that all sides could be seen. So cute and amazing the way it's assembled.


The pillow box was the easiest project to make but the variety on how to decorate them was endless. The pillow box is made with a Sizzix Bigz die-cut and the Easter bunny was stamped with CTMH (Celebrating Life C1128). Some of the boxes were embossed using the Sizzix Textured Impression Embossing Folders (if you look closely at the purple and pink boxes you can see the embossing). I used both transparency and card stock, other ideas created at the workshop used printed card stock which also turned out adorable. I used a tag punch by EK Success and even though you can't tell as easily in the photo, I used an Around The Block paper tagger to attach the tag to the ribbon (love this tool).
Here are the baskets that were made using the Sizzix Bigz XL. There are plenty of ways to decorate the baskets, even just simple patterned card stock was adorable, as well as stamping on plain card stock also gave it another cute look. Embellish as you please or just leave it simple, either way this basket was adorable. Stamps used in the samples came from the two CTMH sets mentioned above.
Below are samples of the projects made by the workshop attendees:
This card was the same template as my original card except that different colors were used.
Above projects showed the variety of looks depending on the pattern of the paper used.
One of the ladies at the workshop needed a Birthday card, so we mixed up the parts from the original card and turned it into this adorable spring like card. I love how the eggs were turned upside down to become balloons!
Thanks to the ladies who attended the workshop (not all pictured above), they did a great job! Some of the projects took some patience and a little engineering but the end result was well worth the adorable products!

March 7, 2009

Pirate themed birthday card

We went to our friend's 30th birthday party today. He's very into the "Pirate" theme, even the invitations were in a bottle with a message inside (very cute). So of course I had to create something pirate related. I didn't do any stamping on this project either (sorry, in the mist of really trying to organize my crafts), so I went the easy route and created the wording/die-cuts on my Quickutz Silhouette (love this machine). Pirate/Sailing paper from "Best Creations Inc" and I think it's called "California" (not sure). And of course I finished it off with a ribbon and metal tag! The backwards B (with the W) was a replication attempt from the invitation, which I think is some kind of nick name for the birthday boy.

February 28, 2009

Mickey Mouse theme birthday card


We went to our friend's 2nd birthday party and her invitation was from Mickey Mouse. So of course I had to created some kind of card that had Disney incorporated and this is what I came up with. I almost forgot to take a picture of it, so I did so just before giving it to the birthday girl.
There was no stamping involved this time, but I did use some "Mickey Mouse" ears scissors to make the top and bottom borders. I also used 2 different sized circle cutters to create the head. My newest fascination in crafting is decorating chip board, so I covered a "2" chip board with some Mickey Mouse paper and then topped off the card with my favorite embelishments... ribbon and a metal tag!


Memorial Service for my Grandma


Today was the memorial service for my Grandma who passed away on 2/19/09 at age 86 after fighting lung cancer for over 2 years. She is my "American" grandmother, who's family adopted our family since the day we came to San Diego back in 1975. She is your text book grandmother, if you looked it up in the dictionary, you could easily find a picture of her. She was not a perfect woman but she was a perfect grandma to me... I will miss her dearly! She's passed on so many recipes and traditions that I will continue on within my family. Here is the card I made for my Grandpa in remembrance and celebration of her life. I love you Grandma!
The card has watermarks of the lily as the background. The lily was stamped and then highlighted with glitter pens. I cut out the heart with a Fiskar Shape Cutter. The picture of her is a peek at the full picture inside that includes the last picture I have with her and my boys at their house last summer. The "cherish" stamp is part of a Hero Arts set.

February 13, 2009

Valentine Treats for School


With Leyton's help, we made Valentine treat boxes for each of his classmates, similar to the ones made in the Valentine's workshop. The size of the boxes were slightly altered to fit the contents of the boxes (there was a fun dip package that dictated the size needed). Each box had a clear heart window, which you can't see because they were covered by the Valentine photo card of Leyton. He loved helping make them and handing them out in class. It was a great way to give a sweet simple personalized gift to his classmates.

February 10, 2009

Valentine Mail Boxes


Since Valentine's involves getting love notes from your friends and family, I like giving little mail boxes to the boys' teachers. I did this last year with Leyton's preschool teacher, but I've cleaned up my design and technique since then. They are so cute and so simple to do. The mail boxes are $1 from Target (seasonal item) and the everything else were scrapbooking items I had around, including simple foam stickers that come in buckets (from Michael's or Wal-Mart). I personalized the mail boxes with rub-ons. The boys helped decorate the mail boxes by putting the extra hearts on, which is always a nice extra touch to the gift!

February 8, 2009

Valentine Photo Cards


Instead of buying the usual Valentine cards in the store for the boys to swap at preschool, this year I decided to be much more creative. I was reading one of my favorite magazines (Creating Keepsakes) and was inspired by a project they showed in their February issue. The title of the article was called "Through the Lens" and can also be found on-line. The project involved a BIG hand written "Happy Valentine's Day" from each of the boys (yes, even my 2 1/2 year old Lincoln traced his own letters all by himself) on a BIG white heart matted on a BIGGER red heart, Photoshop, a digital camera and my adorable boys! If you didn't already know this about me, my other favorite hobby is taking photos. So this project was heaven to me since it incorporated both of my favorite hobbies. I don't often turn my photos into black and white, especially when the photo is already wonderful with all the colors involved, but this time for this particular project, I made the exception.

After editing the photo in Photoshop, I uploaded the images to the Costco Photo store and added a Valentine's border and printed them in wallet size (4 photos to a 5x7). They actually cost less then buying a box of Valentine's and they had a cute personal touch to them!

February 7, 2009

Workshop #2 - Valentine's

My second workshop was focused on Valentine's and Love. Since you don't normally need multiple Valentine's cards, I decided to do multiple projects for the occasion instead. The projects in this workshop included a card, CD frame, candy jar and favor boxes.

I had a handful of ladies join me at my house to build these projects, as well as a bunch of kits that I delivered for the ladies who couldn't make it. I had a great time having the ladies at my house working on their projects.


Here are the details to the projects we made:
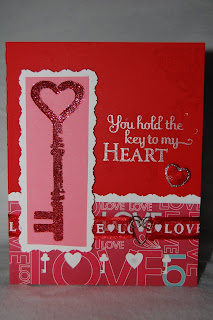
Card - Key to my heart

In My Heart (D1245)

"Key to my Heart" (E1012)

(Not sure of the title of the stamp set, it was a special edition)

The heart key is stamped with a glue pad and covered with glitter. There is a heart paper clip used to "hold" the ribbon together.

CD Frame - Everyday I love you more!

Remember This (B1308)
Chocolate Alphabet Small (D1296)
Classmate Alphabet (D1303)
Here are some samples of alternative ways that this project was completed, courtesy of those who attended the workshop:

The frame is made by using a simple plastic CD case. To make the frame, remove the top piece of the case and turn it over and reattach the piece, which basically makes the frame free standing. The layering of stamped words or images was accomplished using a transparency and attached to the background with brads. Very simple and quick to make!

Candy Jar - Sweets for my Sweetie!

Hearthrob (D1309)

Dream Big (W329)

The jar is from IKEA and a 12"x12" scrapbook paper doesn't completely cover the entire circumference of the jar, so I had to place something at the end points to cover the gap (in this case I used the heart).

Favor Box - Heart filled with Sweets!

In my heart (D1245)

These boxes were made using my new favorite tool the Scor-Pal. You can actually make boxes in any sizes that fit the paper you are using but these particular boxes were approximately 2 1/2" squares. I created the heart window using the Fiskar Shape Cutter and a transparency window. These were for the workshop but keep posted for a sample of how I used them for Leyton's (my son) Valentine's exchange at preschool.

Thanks again to the ladies that either participated in the workshop or bought the kit. Check out the upcoming events listed on the blog to find out some information on the next workshop!

December 14, 2008

Workshop #1 - Holiday Crafts

Here are the crafts projects from the first workshop (of many to come) held at my house! I've only listed the name of the Close To My Heart (CTMH) stamps used with each project. If you'd like a more detailed list of the products used, please contact me.

Christmas Tree Card:
Evergreen D1315
Festive Thoughts D1179

Snowman Header Card:
Christmas Greetings D1178
Jingle Borders D1225

Santa Gift Tag:
Christmas Greetings D1178

For a closer view of the projects and alternative patterns used, please click on the photo below to go to the photo album. Included in the album are pictures of "Christmas is S'more Fun" treats that we made for Leyton's class, as well as Popcorn ornaments (another very simple and delicious recipe) that we gave out to teachers and friends.